Sometimes it's tough to find a bra that fits.

So I'm going to show you something that may fix that.
Who might want to use this technique:
- Ladies who need a bra with a small band size and a large cup size but don't want to have to shop at a specialty store.
- Ladies who have a great bra, but the band has stretched out over time and has gotten too loose
- Ladies who find an awesome bra, but not in their size. (Buy a band size bigger, and a cup size smaller and use this technique to make it fit.)
- Ladies who find themselves between band sizes.
- Ladies who have lost some weight and want to make their bras work a bit longer (as long as the cup still fits)
Who has the skills to do this:
Anyone who is brave enough to cut up something from the store. You don't even have to use a sewing machine. I have done this whole process without use of one a time or two.
Backstory:
I ended up in desperate need to figure this out. You see, when I got married I was a 34D. By week 7 of my pregnancy I was a 34DD. And by the end of my second trimester I was a 34 G! (Yeah I didn't know that was possible either, until it happened!) When I started nursing I was a 34 H!!!
During my shopping adventures, I learned that you actually want your band to be as tight as possible, without being uncomfortable. The weight of your breasts should be supported by the band, not the straps!
Its important to be measured by someone who knows how to measure! If you are large breasted and go to a "regular store" they are likely to put you in a wrong size, one -- because that's all they have, and two -- because they don't really know how to measure past a certain size. (Recently I let a JCPenny worker measure me for kicks, and they would have put my 34 band sized ribs into a 38 band-ed-bra! It never would have worked! She did the thing where you measure band size by measuring above your breasts --- doesn't work! So if you are letting someone help size you, it really is best to go to a specialty store, they know what they are doing.)
Anyway, at this point in my life, not being able to shop at a normal store was a huge blow to my ego as well as to our budget. Since the specialty stores bras were running somewhere around $60 - $80 for the bras that fit me. And when you consider the fact that I went through so many sizes, you will see that I could have drained our bank account just to keep me clothed.
SO,
It was time for a solution.
I know that for some of you this might not be a "perfect" perfect-fit solution. But for me it was an extraordinary sigh of relief to have figured out something. It even helped me get back into cute bras, instead of the grandmotherly ones I had to try on with the huge price tag.
And so, without further ado, here it is.
How to Alter a Bra Band.
----------------------------------------------------
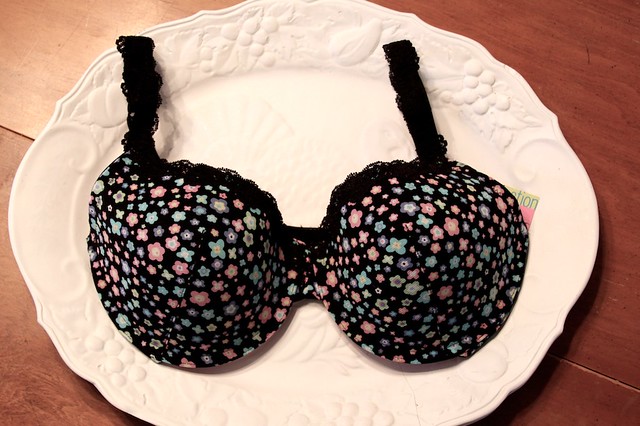
What Bra To Start With:
*This type of alteration is really is only possible on a bra that has a band that goes straight across the back --- some bras have a "U" shape to the band where the straps connect -- that type isn't going to work for this method. (Or any other variation that has a band that gets bigger further away from the clasps.) You might be able to take a bra like that one it down a single band size but no more than that -- the fabric just won't allow it.
If you aren't starting with a bra that you already own, then obviously you need to buy a bra. You can measure yourself and do the math to find your size.
To do this, measure right underneath your breasts where a bra band would normally sit, with all the air out of your lungs. Make sure that you keep the tape level all the way around and pull the two sided together until they meet and lie flat against your body. Do not pull too tightly but it does need to be somewhat snug. Whatever number you get here, in almost all cases just needs to be rounded up to the nearest even number. So if the measurement is 33 than you would just round up to 34. Very easy. But there is one exception to this rule. If you measure 34 1/4 or een 34 1/2, you should round down to 34 instead. The reason for this is simple. Bras lose elasticity every time you wear them so the fit will only get less and less supportive the longer you wear the bra. So when you first purchase a bra it needs to feel snug but not too tight on the LOOSEST hook. Then as the bra stretches from wear, you can move the hooks in tighter to maintain a higher level of support longer. If you buy a bra, and need to wear it on the tightest hook from the start, you have nowhere to go but to buy a new one when it starts getting stretched out. For a bra to be supportive, you must wear the correct band size.
Now, measure the largest part of your bust, for every inch bigger that measurement is than your band size, add a cup size starting with A for 1 inch. (If you measurement lands at a half inch, round up to the next inch.)
Now if you are over a DD, making you a hard to find size, you need to do some more thinking: For every cup size you are over a DD, go up one band size larger than your size and get that in a DD, or go two band sizes larger than your size in a D.
So that will give you a starting point.
Example: If your band is a 34 and your bust measure 6 inches larger you would be one size lager than a DD. (Making you a DDD, E or F depending on brand --- how crazy is it that no one has a set method?!) So if you go to the "regular" store you can get a bra that equals one size larger than a 34DD which would be a 36 DD, or if you can't find that get a 38D.
Or for another example, when I was first nursing, to get a 34H I bought a 44DD. Which is 5 sizes bigger than a 34D (my original size) -- 4 band sizes and one cup size.
But this can get to be a lot of thinking. So sometimes it's just easier to grab a bunch of D or DD bras in a bunch of bigger band sizes and try them on to see which cup fits. Or honestly, sometimes I just hold the cup up over my shirt, and that can give you a pretty good idea before you spend all that time in a fitting room.
Do your best to get the closest to your own band size, but believe me, I know that can sometimes be impossible. So just fly by the seat of your pants.
----------------------------------------------------
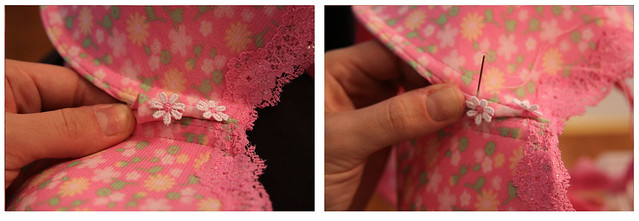
Taking in the center.
This is optional. There are two reasons you might want to do this.
Reason 1) When going up in band size sometimes the spacing between the cups gets larger, so you may want to bring the cups closer together to compensate for that. This approach helps somewhat to alleviate looking wider than you are, which can happen if you have a large bust.
Reason 2)You just plain ol' want more cleavage.
To do this, simply pinch the center fabric together and hand stitch along the edge as near to the cups as possible. Make sure to give it decent amount of reinforcement.
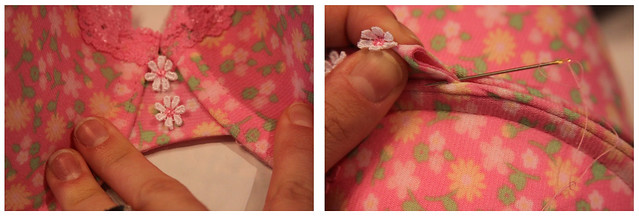
Now the fabric will pucker up a bit so to make sure that doesn't show underneath your clothing hold it down flat as you stitch it in place.
If you want to do this center-adjustment step, you will need to do it first because it will affect the band's circumference a pinch.
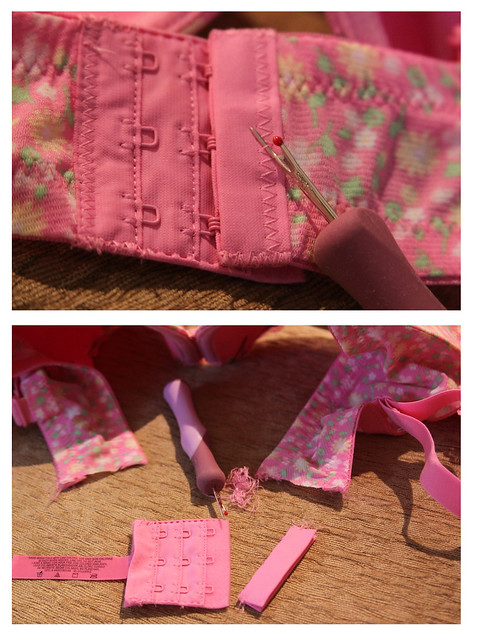
Taking in the band.
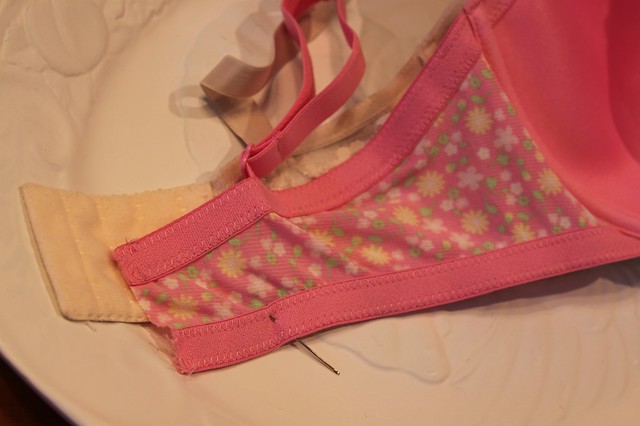
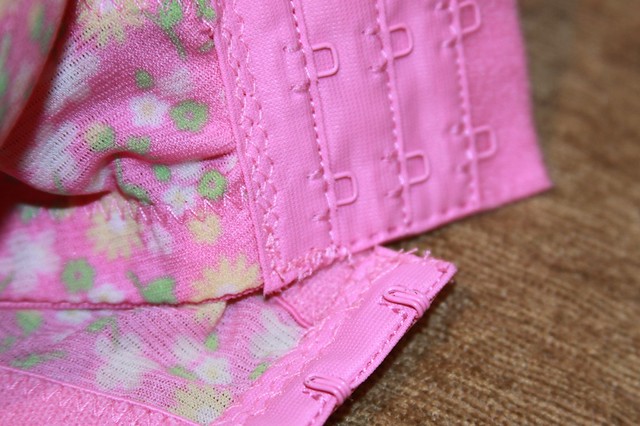
Step 1: Get out the seam ripper and take off the bra's fasteners.
To do this just rip out the seam on the outermost part of that fabric (the solid pink pictured here), you will also need to rip along the top and bottom edge to get it completely off. (You will see as you are doing it.)
(Side Note: It may seem like a great idea to discard the size tag since you know thats not your size, but you might just want to keep it attached for future shopping purposes. For instance, I continue to change sizes as I lose more weight and continue to breastfeed; I can't keep up any more, so oftentimes I forget what size I bought last. Knowing this would help me estimate which size I need now so I've started leaving the tags on.)
Anyway...
Now to get the fit.
There are a couple things you can do.
If you have a bra whose band fits great on you, you can line up the edge of the cups (underwires aligned) to see where the band fabric stops before the fastener fabric and use that as your guide.
Or you can just try on the bra to be altered and pull the band until it feels right and mark it with a pin or a pen. Even though this is tricker, I think its the better way because each bra has its own stretchiness and the one you might be comparing it to might stretch more or less, throwing you off a bit. Here I did both. I tried it on, marked it with a pin and then compared it to a previous bra.
If you are nervous, err on the side of removing less. That way you can always go back and take more off. (But you know you can't add more back if you go too far.)
If you are only taking the band down by one size, say from a 36 to a 34, you might be surprised how little you need to cut off. Don't underestimate that small change, it makes a big difference.
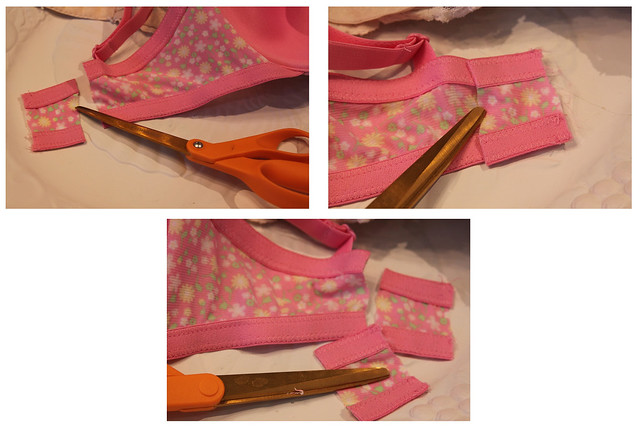
You can compare your 1st cut off piece to the other side for simplicity.
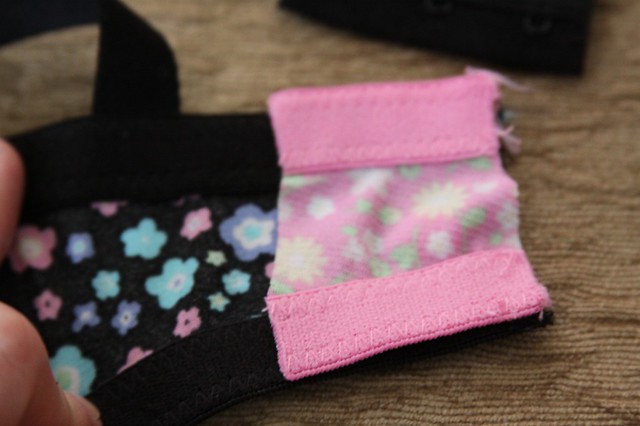
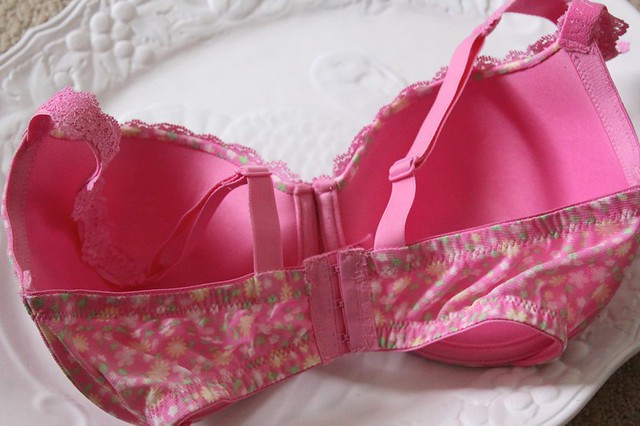
Next step: sew the fasteners back on.
If you have the bra on, the hooks are sewn on your right side, hooks facing in.
The eyes are on the left side, facing out.
(It always helps me to have another bra on hand to make sure I attach the correct side to the correct fastener.)
You can use the zigzag stitch on your machine. I always go back and forth a few times; you can also hand stitch, which I have done in a pinch. It takes longer but when you need a bra, you need a bra.
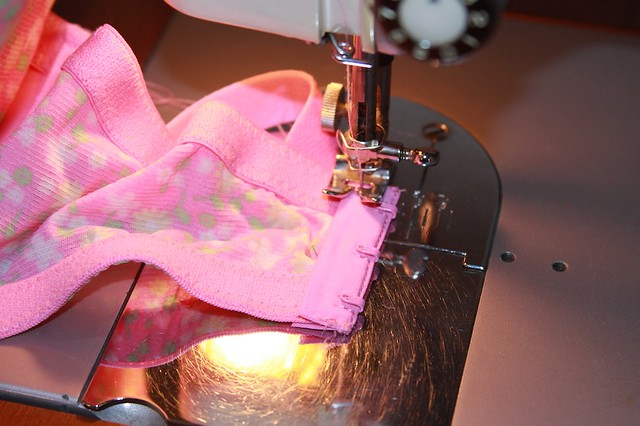
You can see that the fabric bunches up a bit now that the fasteners have been moved in on the band, but it's hardly noticeable. And I don't know about you, but I can't think of many instances when the back of the bra is given much visual attention.
And there you have it, a taken-in bra!
You will notice that the straps are quite close to the middle now. This doesn't bother me at all because I like that it helps them not pop out of tank tops and things. But if that bothers you, or if you had to take in the band so much that they can't stay attached (been there) just cut them off (or seam rip if you prefer) and then zigzag stitch them where you like them. (Try it on and mark the spot.)
So that's the story.
Once you do it a single time it becomes a piece of cake.
I can't even fathom how much money it has saved me over the past year. Over time, this method will literally save me thousands of dollars. It has been a lifesaver. And it's been a fashion saver as well.
So it would be my delight if this tutorial helps you as much as its helped me.
An aside: You might have noticed this is not a nursing bra. This is just as easy to do to a nursing bra, and for goodness sake, some of us need large-cup nursing bras. So you might be wondering what's up with that since I am still nursing. Well, after nine months of breast feeding I ended up not even using the clasps 80% of the time I was nursing as I ended up being able to just lift my breast out faster than I could unhook, and Miss J is in a hurry to eat! So this time I just went for a regular bra knowing that I'll just lift out. I don't know if this method works for you. And I don't know how well it would work when your milk first is in, but it's working well for me right now.
But at some point I plan to do a tutorial on how to turn a regular bra into a nursing bra.
* The one type of nursing bra I don't personally think can really be altered is the cozy type bra -- the lounging, sleeping type. My explanation and recommendation can be found here.
One more thought on this subject: Between my large breasts and the way my baby nursed, I had a much easier time nursing with the help of a nursing pillow. That being the case, traveling out of the house was a little tricky. So I came up with a travel pillow. If you are in the same boat, here is an idea that might help ya out!
Pin It

.JPG)

.JPG)


.jpg)

0 comments:
Post a Comment